udamonic.com
  • Start
    • What is a Scamp?
    • Getting Started
    • Getting Started (Windows)
  • Learn
    • What is Forth?
    • Arithmetic
    • The Stack
    • Creating Words
    • Compilation Tricks
    • Decompilation
    • Comments
    • Characters and Strings
    • Accessing Memory
    • Constants, Variables and Values
    • Flow Control
    • Loops
    • Data Structures
    • Doubles, Triples and Quads
    • FlashForth Dictionary Reference
    • Scamp Dictionary Reference
  • Extras
    • Interrupts
    • Timers
    • Multitasking
    • Delays and Tick Count
    • Processor Words
    • Starting up with turnkey
    • Changing the Prompt
    • Formatting Text on Screen
  • Interfacing
    • Using the LED Array
    • Temperature Sensor
    • Input/Output
    • Analog Input
    • Serial >
      • Serial Communication
      • Scamp Serial Comms
      • Scamp2 UART Pins
    • I2C >
      • I2C Overview
      • I2C Commands
    • SPI
    • PWM
    • Peripheral Pin Select
    • Input Capture
    • Digital Signal Modulator
    • DataFlash
    • RS485
  • Create
    • Scamp Projects on Youtube
    • Prototyping >
      • Protoboards
      • Fabricating PCBs
      • Soldering
    • GPIO >
      • Adding Extra GPIO
      • 32-bit GPIO Module
      • Adding a Low Side Switch
    • Sensing >
      • Measuring Temperature
    • LEDs >
      • Adding LEDs
      • LED arc-welder effect
    • Memory >
      • Adding MRAM
      • AT24C256 EPROM Driver
    • Displays >
      • Adding a 7 Segment Display
      • Adding a Touch LCD
      • Touch LCD GUI
      • Game of Pong
    • FizzBuzz
    • Model Train Control
    • Adding a Real Time Clock
    • 1-D Pacman
  • Resources
  • Buy
  • Consulting
  • About
NOTE: UPDATING YOUR SCAMP FIRMWARE WILL OVERWRITE ANY WORDS YOU HAVE CREATED IN THE DICTIONARY.
​
Scamps are shipped with the latest firmware available. From time to time, updates to the firmware are made to fix bugs or minor issues. This page is to help you update your Scamp to the latest available firmware. 
If you want to update your Scamp firmware to the latest version, you will need a programmer, such as Microchip's PICKIT, and you need to install Microchip's MPLAB IDE suite, which contains IPE. IPE is the software that will upload the new firmware to your Scamp. The Microchip PICKIT is now quite expensive, but I have been told by Scamp users that they have had success with cheap PICKIT clones they have bought from AliExpress. 

FIRMware Images
​

The following hex files are the latest Scamp firmware images. Download the correct file for your hardware. 
 

BSP v1.92, FlashForth 5.32, BETA
Scamp3_1v92_FWDTEN-ON.hex​
Build of version 1.92 with FWDTEN config bit set to ON. Experimental build for Stefan James with configuration bit for the hardware watchdog enabled. No changes to the firmware over previous v1.92. 
​2025/3/12

BSP v1.92, FlashForth 5.32
Scamp2e_1v92.hex
Scamp3_1v92.hex
Scamp3e_1v92.hex
Primary release of v1.92.
Fixes a bug where turnkey won't execute until a host connection is established. Turnkey now executes independent of the host. 
​2024/8/23

BSP v1.91, FlashForth 5.32
Scamp2e_1v91.hex
Scamp3_1v91.hex
​Scamp3e_1v91.hex
Changes to Flashforth including support for s" immediate, and refactoring of code.
​2024/8/2

BSP v1.9, FlashForth 5.3
Scamp3_1v9.hex
Scamp3e_1v9.hex
BSP v1.9 has bug fixes for 'set' (pin 7) and I/O functions associated with pin 9. 
​2024/3/1


BSP v1.8, FlashForth 5.3
​Scamp3_1v8.hex
Scamp3e_1v8.hex
​2023/10/31

Updating Firmware
​

Picture
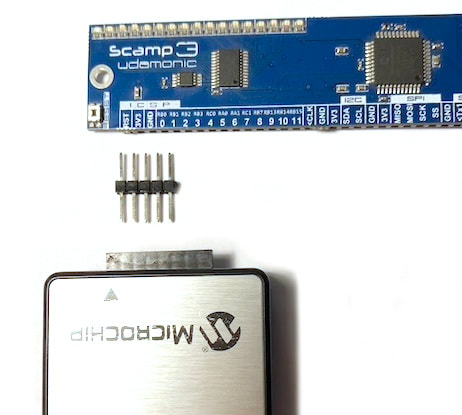
Connecting a PICKIT Programmer to Scamp's ICSP Port
To begin the reflashing process, connect your Scamp to USB power. Your Scamp MUST be powered for programming to work. Connect your programmer to a USB port before connecting it to your Scamp. ​

If you look on the left side of the main connector of your Scamp, there is a group of 5 pins labelled ICSP - these are where you connect your programmer. I use a 5 pin header to facilitate this. (See picture at left.) 

** It is very important to make sure that pin 1 of the programmer (indicated by the triangle) lines up with the first pin (RST) of the Scamp. 
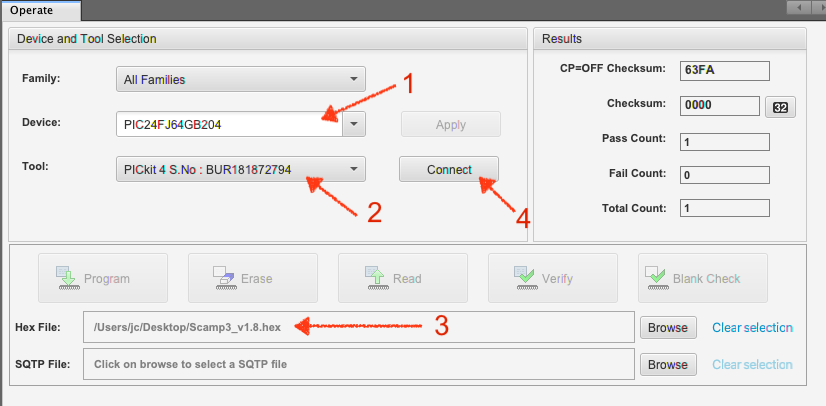

​Run MPLAB IPE.

1: Select the device as "PIC24FJ64GB204" for a Scamp3 or Scamp3e, or "PIC24FJ32GB004" for a Scamp2e.
2: Select the appropriate tool (programmer) that you have, such as a PICKIT. (IPE will display the serial number of the programmer as part of its name.)
3: Load the hex file containing your Scamp firmware.
​4: Click Connect. 
Picture
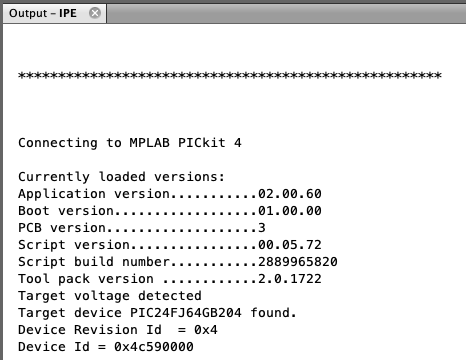
In the Output pane, you should see messages indicating the IPE has connected to the programmer. 
Picture
Once this has completed, click the button to Program your Scamp. ​
Picture
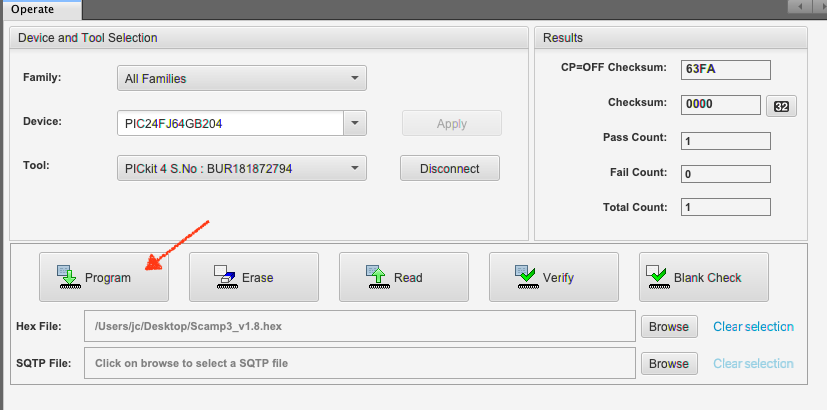
When you see "Programming/Verify complete" you can disconnect your Scamp from the programmer. (You must disconnect the Scamp from the programmer to release it from reset.) 

Once you've reloaded the firmware, connect to the Scamp as per usual with your terminal software and type 'empty' at the ok prompt. This ensures that all the FlashForth variables are initialised to their correct values. Your Scamp is now ready to go.
​
Site powered by Weebly. Managed by Hostwinds
  • Start
    • What is a Scamp?
    • Getting Started
    • Getting Started (Windows)
  • Learn
    • What is Forth?
    • Arithmetic
    • The Stack
    • Creating Words
    • Compilation Tricks
    • Decompilation
    • Comments
    • Characters and Strings
    • Accessing Memory
    • Constants, Variables and Values
    • Flow Control
    • Loops
    • Data Structures
    • Doubles, Triples and Quads
    • FlashForth Dictionary Reference
    • Scamp Dictionary Reference
  • Extras
    • Interrupts
    • Timers
    • Multitasking
    • Delays and Tick Count
    • Processor Words
    • Starting up with turnkey
    • Changing the Prompt
    • Formatting Text on Screen
  • Interfacing
    • Using the LED Array
    • Temperature Sensor
    • Input/Output
    • Analog Input
    • Serial >
      • Serial Communication
      • Scamp Serial Comms
      • Scamp2 UART Pins
    • I2C >
      • I2C Overview
      • I2C Commands
    • SPI
    • PWM
    • Peripheral Pin Select
    • Input Capture
    • Digital Signal Modulator
    • DataFlash
    • RS485
  • Create
    • Scamp Projects on Youtube
    • Prototyping >
      • Protoboards
      • Fabricating PCBs
      • Soldering
    • GPIO >
      • Adding Extra GPIO
      • 32-bit GPIO Module
      • Adding a Low Side Switch
    • Sensing >
      • Measuring Temperature
    • LEDs >
      • Adding LEDs
      • LED arc-welder effect
    • Memory >
      • Adding MRAM
      • AT24C256 EPROM Driver
    • Displays >
      • Adding a 7 Segment Display
      • Adding a Touch LCD
      • Touch LCD GUI
      • Game of Pong
    • FizzBuzz
    • Model Train Control
    • Adding a Real Time Clock
    • 1-D Pacman
  • Resources
  • Buy
  • Consulting
  • About