Connect your Scamp
|
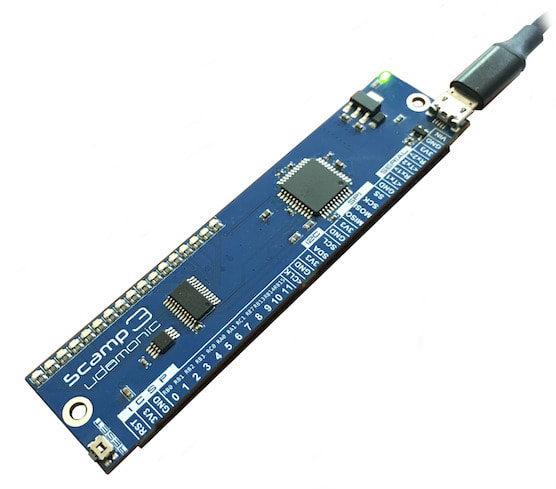
Connect your Scamp computer to a host computer using a Micro USB cable. The USB connection provides both power and communication for your Scamp.
When connected to a host computer or USB power source, the green power LED should light up indicating that your Scamp has power. The power LED is connected to the output of the voltage regulator, and shows that input power is present and the regulator is also operating. |
COMMUNICATING WITH A Windows Computer
Scamps appear as standard USB Serial (CDC) devices. MacOS, Linux and Windows 10 include drivers for CDC devices.
Older Windows Versions - If your Windows version is earlier than Windows 10, it will require a driver to communicate with (any) USB Serial device, see https://docs.microsoft.com/en-us/windows-hardware/drivers/usbcon/usb-driver-installation-based-on-compatible-ids for more information. The Silicon Labs CP2102 driver may work for you (even though Scamp doesn't use a CP2102).
Windows 10 - Windows 10 includes drivers for CDC classes of device. (Using Windows 10 with your Scamp will give you a much smoother ride.)
Windows 11 - Microsoft seem to have broken CDC support with Windows 11. The solution, provided by Paul Verbeke, is to install a Silicon Labs CP2102 driver (even though Scamp doesn't use a CP2102).
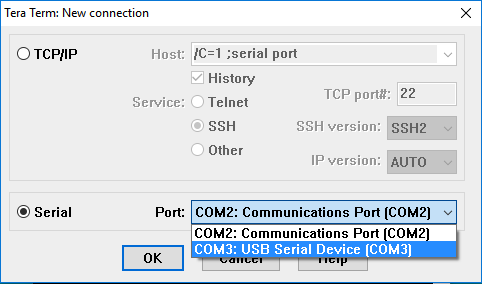
Connect - On Windows, use Tera Term (http://www.teraterm.org) or an equivalent terminal emulator. Your Scamp has commands that use ANSI codes for formatting, so be sure to use a terminal emulator that supports ANSI. Choose a serial connection and select your Scamp (USB Serial Device) from the com port list and connect.
Older Windows Versions - If your Windows version is earlier than Windows 10, it will require a driver to communicate with (any) USB Serial device, see https://docs.microsoft.com/en-us/windows-hardware/drivers/usbcon/usb-driver-installation-based-on-compatible-ids for more information. The Silicon Labs CP2102 driver may work for you (even though Scamp doesn't use a CP2102).
Windows 10 - Windows 10 includes drivers for CDC classes of device. (Using Windows 10 with your Scamp will give you a much smoother ride.)
Windows 11 - Microsoft seem to have broken CDC support with Windows 11. The solution, provided by Paul Verbeke, is to install a Silicon Labs CP2102 driver (even though Scamp doesn't use a CP2102).
Connect - On Windows, use Tera Term (http://www.teraterm.org) or an equivalent terminal emulator. Your Scamp has commands that use ANSI codes for formatting, so be sure to use a terminal emulator that supports ANSI. Choose a serial connection and select your Scamp (USB Serial Device) from the com port list and connect.
|
|
If your Scamp doesn't appear, check that your cable is a full USB cable. Some people have been caught out by charger-only cables that supply power, but don't support comms.
|
|
Once connected, set your font to be something readable for you.
|
|
Note that the FlashForth site has a python shell (in the section Interacting with FlashForth) that can be used in place of a terminal program. Jan Langevad has a standalone Windows shell that provides a nice interface for Windows' users to interact with Scamp. You can download Jan's shell here: https://sites.google.com/view/myffshell/start. It supports both Scamps and Arduinos running FlashForth.
|
|
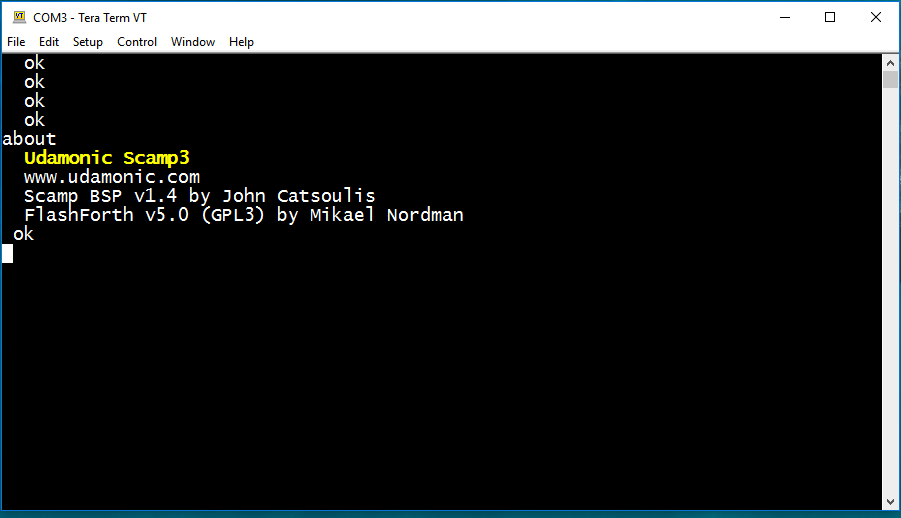
OK
Press the return key a few times, and Forth should respond with ok. That’s Forth’s prompt. Forth is very much old school. You type commands in, and get a response on the console. There’s no integrated development software to install on your host computer. You interact directly with the machine.
Forth says ok when it’s ready for your next command.
Forth says ok when it’s ready for your next command.
|
|
Forth does not have a command history. Typing an up or down arrow on your keyboard will send key codes that will just confuse it. If you use a text editor to write your code and then paste it into Forth, be sure to have smart quotes turned off and no rich-text formatting. The hidden formatting codes found in rich text make no sense in a Forth environment.
|
|
LEDs
There is a LED on your Scamp that you can use as a status indicator in your applications. Type:
ledon
and press the return key, and the LED will turn on. Conversely:
ledoff
will turn the LED off, while:
blink
will make it blink once. You can use these commands within your programs to control the LED.
The Scamp2 and Scamp3/3e have an additional array of 16 red LEDs that you can use in your application. To write a value to the LEDs, place the value on the stack and then call the leds word. For example, to turn all the LEDs on, type the (hex) value of $ffff and call leds.
$ffff leds
To turn the LED array off:
0 leds
Your First Program
|

|
Type in the following program called "test" (spaces are important):
: test begin random leds blink key? until ;
Now type:
test
That's how easy Forth is. (Press any key to stop test.)
Reset
If at any stage you get stuck and need to restart your Scamp, press the RESET button. A hardware reset will also cause your USB connection to reset, therefore you will need to reestablish the connection with your host computer.
Alternatively, you can trigger a warm (software) reset by typing the warm command at the prompt.
Alternatively, you can trigger a warm (software) reset by typing the warm command at the prompt.
The empty word can be used to restore Forth back to "factory settings." Any programs (words) you have created will be erased, and all system parameters will be reset to their default. If you have created a buggy program that permanently snarls Forth so that it no longer works properly, use empty to reset everything back to normal.
The about command will display version number and copyright information.
The free command will show you how much Flash and RAM is available.
The about command will display version number and copyright information.
The free command will show you how much Flash and RAM is available.
|
|

|
Note that the FlashForth website has some example source code. The demo program "Sieve" is buggy and is known to corrupt FlashForth. DO NOT RUN IT. It may render your Scamp unusable, and your Scamp will require reflashing to recover.
|
|
Next, learn about Forth and its history.