CREATE : DISPLAYS : Touch LCD GUI
This page shows you how to add user interface elements to the Nextion NX3224K024 Touch LCD. Make sure you've read Adding a Touch LCD and you have added the words setbaud, flush, and emptybuf to your dictionary.
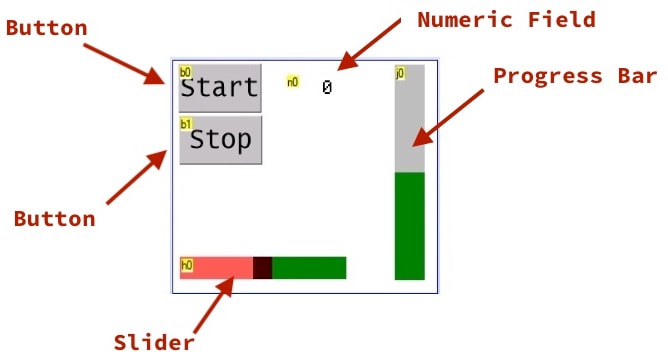
Using the Nextion GUI Editor (available on the Nextion website), here's an example a GUI for the LCD with two buttons (b0 and b1), a numeric field (n0), a vertical progress bar (j0) and a slider control (h0).
|
You can download this TFT file if you want to load into your LCD:
| ||
Objects are numbered in the order they are created. The first button is b0, the second button is b1 and so on. The commands sent to the LCD should be very familiar to anyone who has done object-oriented programming. For example, to send the value 44 to the progress bar j0, the command for the LCD is j0.val=44. To read from the LCD, there are two commands available. get returns the data within a packet. prints is simpler to use, and simply returns the value. For example, to return the value from slider h0, we request one byte using the command prints h0.val,1.
The following constants define the object types that have a val parameter.
98 constant button
99 constant checkbox
104 constant slider
106 constant progress
110 constant numeric
114 constant radio
120 constant xfloat
122 constant gauge
Writing to an LCD Object
The following word definition will set the value for an object. It takes the value from the stack followed by the object type and object number, and sends this to the LCD.
: val ( value object objID -- )
lcd
swap emit \ object type
<# s>d #s #> type \ output object ID
." .val="
<# s>d #s #> type \ value
eoc console
;
To send the value 20 to the numeric field n0:
20 numeric 0 val
To send the value 90 to progress bar j0:
90 progress 0 val
To set slider h0 to 0 at startup:
0 slider 0 val
In this demo, we sample an analog input connected to pin 2, scale it down to within the range 0..99, and then display it on both the progress bar and numeric field.
: demo
flush emptybuf \ housekeeping
2 analog \ analog source on pin 2
2 channel
begin
sample 41 / \ sample and scale
dup \ sending to two objects
progress 0 val
numeric 0 val
key? until
;
Reading from an LCD Object
The following word definition will read the current value for an object. It takes the object type and object number from the stack, and returns the current value from the LCD.
: val? ( object objID -- val )
lcd
." prints " \ request object type
swap
emit \ output object type
<# s>d #s #> type \ output object number
." .val,1" eoc \ send parameter type and end of command
console
rx1 \ read value
;
To read the current state of slider h0:
slider 0 val?
LCD System Variables
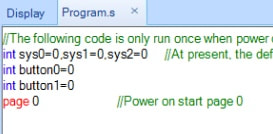
The LCD has three system variables that you can use to hold state information. You can create more in the Program.s pane of the Nextion GUI Editor.
To set a system variable:
To set a system variable:
: sys ( value objID -- ) \ send value to numeric field
lcd
." sys" \ system variable
<# s>d #s #> type \ system variable ID
." ="
<# s>d #s #> type \ value
eoc console
;
To read from a system variable:
: sys? ( objID -- val )
lcd
." prints sys" \ request system variable
<# s>d #s #> type \ output variable number
." ,1" eoc \ send parameter type and end of command
console
rx1 \ read value
;
For example to read the value from sys0 and then send the value 39 to sys3:
0 sys?
39 3 sys
Buttons
The "Stop" button in our example GUI is button 1. To read the current state:
button 1 val?
Now there's a catch with this. This will only return a '1' if the button is read while it is being pressed. The LCD does not latch a button press event.
|
So, in the GUI editor, under the Program.s pane, we can create two variables, button0 and button1, to use as flags for our button events.
|
|
Next, in the editor select each button in turn and add code to set the variable flag when a Touch Press occurs:
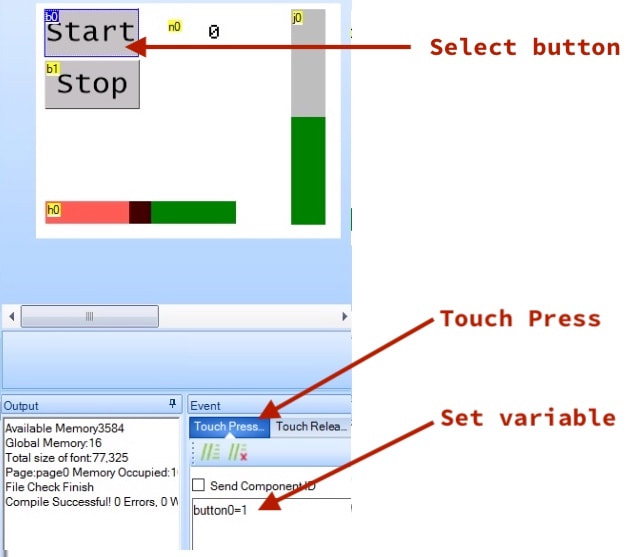
When you build the TFT file using the editor and install it on your LCD, it will run code that will set the variables and thereby remember the button press.
The following word will request the state of a button variable:
: press? ( objID -- val )
lcd
." prints button" \ request button variable
<# s>d #s #> type \ output object number
." ,1" eoc \ send parameter type and end of command
console
rx1 \ read value
;
This word will return a 0 if no press, or a 1 if the button has been pressed. Note, the error code from the LCD for a misunderstood command is 26 255 255 255. If you get a 26 on the stack, then the LCD had an error processing your command. Use emptybuf to clear your input buffer.
Once we've read the flag, we should clear it:
Once we've read the flag, we should clear it:
: buttonclr
lcd
." button" \ button variable
<# s>d #s #> type \ button variable ID
." =0" \ make it 0
eoc console
;
So for example, to read our buttons (b0 and b1), we can do something like:
0 constant START
1 constant STOP
START press? . \ was the START button pressed?
START buttonclr \ reset flag
STOP press? . \ was the STOP button pressed?
STOP buttonclr \ reset flag